The most expensive trade I ever took was the one I deserved. EURUSD had ripped 90 pips through the London open, clean drive, no wicks worth naming, and I bought the top of the high at 1.0932 because the breakout was “confirmed” and I could not stand watching it run without me. Twenty minutes later price pulled back 35 pips — a normal, healthy, textbook pullback — and stopped me out for −$500. Then it did exactly what I had predicted: it ripped another 80 pips higher into the New York session. I was right about the direction, right about the trend, right about everything except the one thing that mattered: my entry gave the trade no room to be right. That Tuesday cost me half a percent of a $100k challenge account and taught me the lesson that now sits at the top of every trading plan I write: on a prop firm account, you do not get paid for predicting direction. You get paid for entries that survive the noise.
In this article
- The Tuesday I Stopped Chasing Breakouts
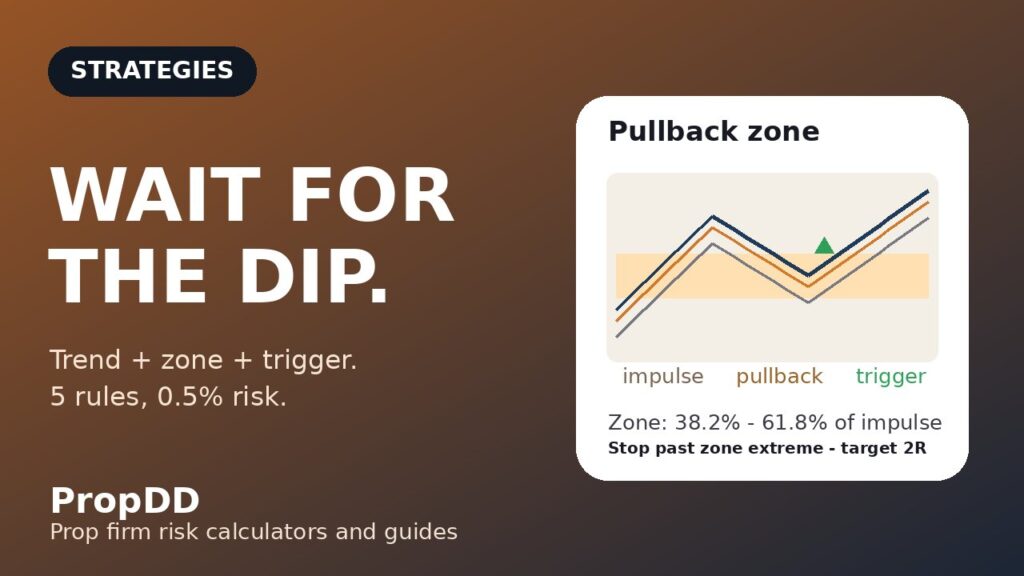
- The Five Rules, All in One Table
- Rules 1 and 2: How I Define the Trend and the Pullback Zone
- Rules 3 and 4: My Entry Trigger, Stop and Target
- The Sizing Maths That Keeps the Daily Loss Limit Safe
- I Tested It: Five Pullback Trades, Trade by Trade
- Rule 5: The Session Filter That Saves Me From Myself
- When the Pullback Plan Fails
- How This Strategy Fits Prop Firm Rules
- Frequently Asked Questions
This guide is my complete trend pullback strategy, built for the prop firm reality: five rules that cover the trend definition, the pullback zone, the entry trigger, the stop and target, and the session filter — plus the position-sizing maths that keeps a 5% daily loss limit safe, five real pullback trades worked trade by trade, and an honest section on when the whole plan fails. If you have read my London breakout strategy, treat this as its calmer sibling: same respect for structure, none of the chasing.
The Tuesday I Stopped Chasing Breakouts
Let me reconstruct that Tuesday, because the failure was mechanical, not emotional. EURUSD opened the London session inside a 25-pip Asian range. At 08:15 a strong bullish candle closed above the range high, and the next two candles added another 40 pips. My breakout rule said buy. I bought at 1.0932 — the absolute high of the move — with a 20-pip stop, because “breakouts need tight stops”. The pullback arrived on schedule: 35 pips down into the broken range, which tagged my stop at 1.0912 for −$500 and then, freed of my position, climbed 80 pips without me. The maths of that loss is what stung. A 90-pip trend with a 35-pip pullback cannot be traded from its high with a 20-pip stop. The entry had to be inside the pullback, with the stop below it — which is exactly what the next five sections build.
The deeper problem was that chasing breakouts made every rule on a challenge account harder. My personal daily stop was $1,500, and one chased entry had eaten a third of it before 09:00. The pullback plan fixed all of it at the source: fewer entries, better prices, wider-but-safer stops, and a built-in reason to sit on my hands when the setup is not there.
The Five Rules, All in One Table
Everything below is a detail of these five rules. I keep them on a sticky note on my monitor, and I do not take a pullback trade unless all five check out.
| Rule | The rule | Why it exists |
|---|---|---|
| 1 — Trend | Price above a rising 20 EMA, 20 EMA above a rising 50 EMA, and higher highs plus higher lows on the 1-hour chart | Stops me buying “pullbacks” in ranges, which are just the tops of chop |
| 2 — Zone | Pullback must reach the 38.2–61.8% retracement of the last impulse leg, or the 20 EMA, whichever is deeper | Shallow 10-pip dips are noise, not entries — the zone is where the maths works |
| 3 — Trigger | A 15-minute candle closes back in the trend direction from inside the zone | Confirmation that buyers are defending the zone, not hope that they will |
| 4 — Risk | Stop beyond the pullback extreme; 0.5% risk per trade; target at least 2R at the prior impulse high | Survives the pullback deepening and keeps three losses inside my daily stop |
| 5 — Session | Trade only 08:00–11:00 London and 13:30–16:00 New York; flat 30 minutes around red news | Pullbacks need real order flow — thin hours produce fake zones and fake triggers |
Rules 1 and 2: How I Define the Trend and the Pullback Zone
Rule 1 is deliberately strict, because a pullback strategy lives or dies on trend quality. On the 1-hour chart I need three things pointing the same way: price above a rising 20-period EMA, the 20 EMA above a rising 50-period EMA, and visible market structure — higher highs and higher lows for longs, the mirror for shorts. If any one of the three disagrees, I have no trend, which means I have no pullback trade.
Rule 2 defines where the pullback becomes tradeable. I measure the Fibonacci retracement of the last clean impulse leg — the sharp move that established the trend — and my zone is the 38.2% to 61.8% band of that leg, or a touch of the 20 EMA on the 15-minute chart, whichever the pullback reaches first. A 15-pip dip that never reaches the zone is not a missed trade; it is the market telling me the pullback is too shallow to pay for its own stop. Babypips’ definition of a pullback makes the same distinction I trade on: a temporary pause in the trend, not a reversal — and the 61.8% line is roughly where “pause” turns into “maybe reversal”, which is why my zone ends there.
| Pullback depth | What it usually means | My action |
|---|---|---|
| Under 23.6% | Shallow pause; buyers never left | No trade — chasing it repeats the breakout mistake |
| 38.2–50% | Healthy pullback; ideal zone | Watch for the trigger candle |
| 50–61.8% | Deep pullback; still valid | Trade it, but expect a slower resume |
| Beyond 61.8% | Structure breaking; possible reversal | No trade — this is someone else’s reversal setup |
Rules 3 and 4: My Entry Trigger, Stop and Target
Rule 3 is the patience rule. Once price is inside the zone, I do nothing until a 15-minute candle closes back in the trend direction — a bullish close for longs, a bearish close for shorts. The close is the evidence that the other side stepped in. On average this costs me 5–8 pips of the move versus a perfect zone touch, and it saves me from every pullback that kept falling through the zone into a reversal.
Rule 4 is the risk rule, and it is the one that makes the strategy prop-firm-safe. The stop goes beyond the extreme of the pullback — below the pullback low for longs — plus a small buffer of about 20% of the zone depth, so normal wick extensions do not take me out. The target is the prior impulse high at minimum, which almost always gives at least 2:1 reward-to-risk from a zone entry. Risk is fixed at 0.5% of the account per trade, never negotiated, never doubled after a loss — my position sizing guide covers why that number survives losing streaks that would end a 1%-risk account.
The Sizing Maths That Keeps the Daily Loss Limit Safe
Here is the part most strategy guides skip, and the part that matters most on a funded account. My numbers: a $100,000 account, a firm daily loss limit of 5% ($5,000), and my own personal daily stop of $1,500 — 30% of the firm’s limit, set the way my personal daily stop guide describes. At 0.5% risk per trade ($500), three consecutive losses cost $1,500 and end my day with the firm’s limit untouched. That arithmetic is the whole safety case: the strategy can be wrong three times before lunch and the account still survives.
Position size formula
Lots = Risk ($) ÷ (Stop distance in pips × Pip value per lot)
Example — EURUSD long: $500 risk ÷ (25-pip stop × $10 per pip per lot) = 2.0 lots
Example — USDJPY long: $500 risk ÷ (30-pip stop × $9.50 per pip per lot) = 1.75 lots
Check: 3 losses × $500 = $1,500 = my personal daily stop, with $3,500 of room left before the firm’s $5,000 limit.
Notice what the formula does to deep pullbacks: a deeper zone means a wider stop, which means a smaller position for the same $500 risk. The maths automatically de-risks the trades I am least sure about.
I Tested It: Five Pullback Trades, Trade by Trade
These are five consecutive pullback setups from my journal across two weeks on the $100k account — not cherry-picked winners, which is why trade 2 and trade 5 are in the table. Every trade risked exactly $500 (0.5%), followed all five rules, and was logged the same evening. I also log each trading day in my minimum trading days tracker so the strategy’s natural pace — one or two setups a day — doubles as progress toward the firm’s minimum-days rule instead of fighting it.
| # | Pair & direction | Setup | Entry / Stop | Size | Result |
|---|---|---|---|---|---|
| 1 | EURUSD long | Pullback to 38.2% of the London drive; bullish 15m close | 1.0852 / 1.0827 | 2.0 lots | +$1,000 (+2R) |
| 2 | GBPUSD long | Pullback to the 20 EMA; trigger printed, then CPI revision headline hit | 1.2685 / 1.2655 | 1.67 lots | −$500 (−1R) |
| 3 | USDJPY long | Deep pullback to the 50% zone; slow resume as expected | 149.80 / 149.50 | 1.75 lots | +$998 (+2R) |
| 4 | US30 long | Index pullback to the broken London high; clean trigger at the cash open | 42,100 / 41,950 | 3.33 lots | +$999 (+2R) |
| 5 | XAUUSD long | Pullback sliced through 61.8% after the trigger — trend was exhausting | 2,651.0 / 2,646.0 | 1.0 lot | −$500 (−1R) |
I now run every pullback setup through the Trend Pullback Calculator before I place it — it turns the zone depth, the stop beyond the swing and the R targets into exact numbers sized under my daily loss limit.
The two-week tally: 3 wins, 2 losses, gross +$2,997, net +$1,997 (+4R) after the two stopped trades. The honest read: the strategy did not win because pullbacks are magic — it won because every loss was capped at $500 while every win ran to the prior high. Trade 2 is the one I show new traders first: the setup was valid, the trigger printed, and a headline still stopped me out — the cost of doing business, pre-priced at half a percent.
Rule 5: The Session Filter That Saves Me From Myself
Pullback zones drawn in thin markets are mirages. The Asian session drifts, prints a “pullback” into a 20-pip drift, and the trigger fires on noise. My session filter is blunt on purpose: I only take pullback trades during the two windows below, and I go flat 30 minutes before and after red-folder news — the same blackout my news trading guide uses, because trade 2 above is what happens when you do not.
| Window (server time) | What I do | Why | |
|---|---|---|---|
| 08:00–11:00 London | Primary window: mark impulse legs, wait for pullbacks | Real order flow; cleanest impulse-and-pullback rhythm of the day | |
| 13:30–16:00 New York | Secondary window: continuation pullbacks only, no fresh trends | Trends established in London often give one more pullback entry | |
| All other hours | No new pullback trades; manage or close only | Thin liquidity turns zones into traps; boredom trades live here | |
| ±30 min around red news | Flat. No entries, no exceptions | News spikes slice through zones and stops alike |
When the Pullback Plan Fails
No strategy section is honest without this one. The pullback plan has three natural enemies, and I have paid tuition to each of them.
| Failure mode | The warning sign | What I do |
|---|---|---|
| Range day disguised as a trend | Second “pullback” of the day overlaps the first; EMAs flatten | Rule 1 re-check after every trade; flat if structure breaks |
| Trend exhaustion | Pullbacks get deeper each time (38% → 50% → 61.8%+) | Skip the third pullback of a leg — the trend is tiring (see trade 5) |
| News shock mid-pullback | Unscheduled headline; spread widens suddenly | Accept the stop; no re-entry for 30 minutes (see trade 2) |
The pattern across all three: the strategy does not fail by producing a bad entry so much as by producing a late one. The defence is always the same — re-verify Rule 1 before every entry, not just the first of the day. A trend is a perishable condition, and yesterday’s trend is today’s range.
How This Strategy Fits Prop Firm Rules
The pullback plan was designed inside prop firm constraints, not adapted to them. One or two setups a day keeps me far under any trade-count cap and naturally spreads activity across the calendar, which feeds the minimum trading days rule instead of fighting it. The fixed 0.5% risk means a full losing day is $1,500 — my personal stop, hit before the firm’s 5% limit is ever in sight. And the 2R minimum target keeps any single day from dominating total profit, which is exactly what the consistency rule rewards: in my five-trade sample the best day was about a third of the total, comfortably inside typical 30–40% consistency limits.
Frequently Asked Questions
Is pullback trading better than breakout trading on a prop firm account?
For most challenge traders, yes — not because pullbacks win more often, but because they lose less per mistake. A breakout entry at the high of a move has no room for the normal pullback that follows; a pullback entry is placed after that noise has already happened. On an account where one 5% day ends the challenge, the entry with built-in room for error is the safer business decision.
How deep can a pullback go before it is a reversal?
My line is the 61.8% retracement of the impulse leg. Pullbacks into the 38.2–61.8% band are normal profit-taking; a close beyond 61.8% with momentum usually means the structure is breaking and the “pullback” is becoming a reversal. I do not trade the grey area — if it is past 61.8%, the setup is cancelled and I wait for a new impulse leg.
What timeframe works best for pullback entries?
I define the trend on the 1-hour chart and take the trigger on the 15-minute chart. The hourly keeps me out of intraday chop; the 15-minute gives a precise trigger without the spread-and-noise problems of the 5-minute. Dropping to lower timeframes for “better” entries usually just manufactures more trades, which is how daily loss limits get breached.
Can I trade pullbacks during news?
No — and this is a hard rule, not a suggestion. I am flat 30 minutes before and after red-folder releases. News spikes do not respect zones, they slice through the 61.8% line, trigger the entry, and stop you out in one candle. Trade 2 in my journal above is the receipt for the one time I was careless about the calendar.
How many pullback trades per day fit a daily loss limit?
With 0.5% risk per trade and a $1,500 personal daily stop on a $100k account, the maths allows three full losses before I am done for the day. In practice I take one or two setups — quality pullbacks are scarce, and forcing a third usually means trading a B-grade zone. Scarcity is a feature: fewer trades mean fewer commissions and less drawdown bleed.
Does the pullback strategy work on gold and indices too?
Yes, with wider stops. XAUUSD and US30 pull back further and faster than EURUSD, so I size down via the same formula — the stop distance grows, the position shrinks, the $500 risk stays fixed. Trades 4 and 5 above are a US30 and a gold trade using exactly the same five rules. Do not copy forex stop distances onto gold; let the formula do the adjusting.
Risk disclaimer: Trading leveraged products on a prop firm challenge can result in the loss of your evaluation fee and account. The trades above are from my own journal for illustration — they are not signals, and past setups do not guarantee future results. Never risk money you cannot afford to lose, and always read your firm’s exact drawdown and news rules before trading a strategy live.




78 comments
[…] together means there is no trend and no trade. It pairs naturally with the pullback framework in my trend pullback strategy guide, where the same 20/50 structure defines the zone I wait […]
[…] The strategy is the risk envelope around the entry. If you have not internalised that, read my trend pullback strategy next — same philosophy, different […]
[…] pin bar printing as a pullback inside an existing uptrend — the kind of bounce I described in my trend pullback strategy — wins far more often than a counter-trend pin bar trying to pick the absolute top. On a […]
[…] what lets me improve instead of just feeling bad about it. It is the same location-first DNA as my trend pullback plan; reviewing them together shows me which market regime I am actually reading […]
[…] nothing. My rule is mechanical — two color flips inside ten candles and I close the charts. The trend pullback strategy I wrote earlier has the same guard for the same […]
[…] The daily loss limit. Bull flags are kind to drawdown rules because the risk is fixed before entry — there is no position to “manage” into a bigger loss, no martingale temptation, no averaging down. My worst possible day under the six rules is two stopped trades: −1.0% of the account, and my personal daily stop fires long before the firm’s $2,500 limit is ever approached. Compare that with the trend-pullback entries I used to take with 40-pip “discretionary” stops, where one bad afternoon could eat half the daily limit in a single trade. My take on the pullback variant is in the trend pullback strategy for prop firm traders. […]
[…] — or, with Aroon filtering out the range days where most of those losers cluster, maybe four. The trend pullback strategy I trade pairs naturally with this: Aroon tells me the trend is fresh, the pullback gives me the […]
[…] is my only discretionary piece. I read it from the H4 trend using the same rules I wrote up in my trend pullback strategy — trade with the H4 direction or don’t trade. Kill zones give me the when; the H4 trend […]
[…] divergence only, because hidden divergence is really a pullback entry in disguise — and my trend pullback strategy already covers that ground with cleaner rules. The Babypips regular divergence lesson explains the […]
[…] account needs. For the structure half of the setup I use the same pullback rules I wrote up in my trend pullback strategy — AO just tells me whether momentum agrees with the […]
[…] on this site, ABCD differs from head and shoulders (a three-swing topping structure) and from trend pullbacks (which need a confirmed trend first). It appears inside trends, at trend ends, and in ranges — […]
[…] it with the trend pullback strategy and you get a complete system: the vortex cross defines the trend direction, the pullback to the […]
[…] (4, 5, 8) producing different results because of the entry drift. The setup I was copying is the trend pullback strategy I trade on my funded […]
[…] part of the move is often done. On red-news days I trade the first hour off my trend pullback rules with wider stops or not at all; ADX confirms the aftermath, it does not protect the […]
[…] the daily clock ticks. My rule: two sessions without TP1, I am out, usually around breakeven. The trend pullback strategy taught me the same lesson from the other direction: funded trading rewards completed plans, not […]
[…] pullbacks only — see my trend pullback plan; no […]
[…] on a funded account that asymmetry is the entire game. It pairs well with the pullback logic in my trend pullback strategy guide, which uses the same discipline of waiting for price to come to a level instead of chasing […]
[…] Check the totals: six winners at +$900, +$1,000, +$750, +$900, +$1,100 and +$750 sum to +$5,400, four losers at $500 each sum to −$2,000, and +$5,400 − $2,000 = +$3,400, which is 6.8R at $500 risk. Every loss was exactly $500, never more, because the stop was structural and I never moved it. The RVI did not predict the market; it filtered out entries where conviction was absent, and that filter is the entire edge. It pairs naturally with the pullback logic in my trend pullback strategy guide. […]
[…] at 3R does not dominate a week the way a single oversized gamble does. For related reading, see my Trend Pullback Strategy for another slow, rule-based entry, my London Breakout Strategy for the faster breakout cousin of […]
[…] daily-loss room, in that order, and if any check fails I trade nothing. For related reading, see my Trend Pullback Strategy for a trend-following entry that pairs naturally with a bulge warning, and use the site’s […]
[…] a cycle turn in a sideways market reverses into more sideways noise. For related reading, see my Trend Pullback Strategy guide for how I trade with-trend pullbacks, and my Mass Index guide for the opposite warning, range […]
[…] momentum cross in a sideways market reverses into more sideways noise. For related reading, see my Trend Pullback Strategy guide for how I trade with-trend pullbacks, and my MACD guide for the faster cousin of this […]
[…] can still breach a daily limit, so the budget check comes before the order, not after the loss. My trend pullback guide uses the same budget-first […]
[…] reading on this site: the trend pullback plan pairs naturally with a rising McGinley line, the choppiness filter covers the flat-line problem […]
[…] trend pullback guide covers the other side of this coin: when the higher timeframe trend is intact, a pullback entry […]
[…] reverse often. I take flags only in London and New York hours, the same session filter I use for my trend pullback strategy, because that is when the volume behind the pole actually exists. A pattern without participation […]
[…] profits are actually worth after the firm’s share. Compare this with slower patterns like the trend pullback or two-candle reversals like the tweezer top and bottom: the marubozu is faster, needs fewer […]
[…] also pairs well with the trend filters I already use. I check the flip against a trend pullback structure: a long flip that lands on a pullback into a rising structure is a better trade than a […]
[…] decide whether I trade; it decides which direction I trade when my normal setups appear, as in my trend pullback plan and my Klinger volume notes. The Coppock line only vetoes the ones pointing the wrong way, and I […]
[…] do I enter, with the stop beyond the pullback extreme. That is the same pullback logic I use in my trend pullback strategy, and the HMA simply gives that strategy a faster, cleaner line to pull back to. If you already […]
[…] I have already covered here. A bull flag is a multi-swing channel that takes days to form, a trend pullback is a single retracement into a zone, and a kicker is a two-candle gap reversal that changes […]
[…] not carry the same accumulation story. If you cannot wait weeks, trade a faster pattern like the trend pullback instead, and leave cups to traders who can […]
[…] Oscillator also pairs cleanly with the systems I already trade. A trend pullback is the same entry with a different trigger, and the Oscillator tells you whether the pullback […]
[…] to prove the buyers came back. The shooting star guide covers the bearish mirror in full, and the trend pullback strategy covers what to do when the reversal fails and the trend simply […]
[…] a 30 percent cap. Third, it pairs with the rest of the funded-account toolkit on this site: the trend pullback gives the entry structure, partial closes manage the 1R and 2R exits, and the max daily drawdown […]
[…] rules, and the daily routine that keeps the whole thing to ten minutes. It pairs naturally with the trend pullback plan I published earlier, because pivots tell me where the pullback should stop, and with the supply and […]
[…] bad trades is the whole edge. If you want the same discipline applied to a trend setup, read the trend pullback guide next, and compare its filter to this one: both systems win by skipping, not by […]
[…] marker. Williams designed fractals as breakout levels in the trend’s direction, and the trend pullback strategy on this site makes the same point from the price-action side: trade with the direction, use the […]
[…] For the position-sizing maths behind the 500 dollar risk figure, I use the same sizing logic as my trend pullback strategy, and for placing stops behind visible structure rather than round numbers, my Williams fractal […]
[…] pair the ratio with two other tools on this site. Trend pullback supplies the entry rules once the ratio’s gate is open, and the Max Daily Drawdown Calculator […]
[…] take a Fisher signal within thirty minutes of a red-folder event on the pair I am trading. The trend pullback strategy on this site pairs naturally with Fisher as a timing tool: the pullback defines the zone, […]
[…] 40-to-90-pip window is where the pattern, the stop, and the funded-account maths all line up. The trend pullback strategy uses the same logic in a different form: only take the setup when the structure gives you a stop […]
[…] is daily-limit room I still own at the New York open. If you pair MFI with a trend strategy, my trend pullback guide shows how a pullback entry and a green-bar confirmation can share one stop and one risk cap without […]
[…] pullback long on EURUSD, H1, in the direction of a rising trend — the same pullback structure the trend pullback guide uses, with the Chandelier Exit supplying the exit instead of a fixed target. The highest high of […]
[…] come back down from its extreme, which together say the panic has passed and a trend can form. The trend pullback strategy on this site pairs well with this rule, because a pullback after a spike is a far safer entry than […]
[…] can gap straight through a stop, and a funded account has no patience for that kind of loss. My trend pullback strategy uses the same evening-scan habit, and it is the routine that keeps both strategies […]
[…] last distinction: the trend pullback strategy waits for price to return to a zone on a candle chart and then continue, while the Renko strategy […]
[…] each higher than the last, it is not three drives at all, no matter how tired the trend looks. The trend pullback strategy is the trade to take when the trend is healthy; three drives is the trade to take only when the […]
[…] I check location on the higher timeframe before I drop to the entry timeframe, the same habit the trend pullback strategy uses: the level is what turns a candle into a trade, and a candle without a level is just a shape […]
[…] it turns “how much room do I have left today” from a feeling into a number, and the trend pullback strategy is the continuation plan I switch to once a belt hold has confirmed a reversal, rather than chasing […]
[…] to confuse with them. The London breakout trades a range box, not a time window with a gap. The trend pullback trades a retracement to a trend line or average, at any hour, not a displacement gap inside one […]
[…] it came from following the same plan five times, not from one brilliant call. Compare that with the trend pullback strategy, which trades the same idea, buying strength after a pause, but enters on the pullback itself […]
[…] is not that RMI is profitable and RSI is not — both oscillators lose money traded raw, and my trend pullback guide makes the same point about structure without a filter. The lesson is that the filter is the system. […]
[…] to skip. For the wider context of keeping a funded account alive beyond any single indicator, the trend pullback strategy shows the same discipline — trend first, entry second, size fixed — applied to price action […]
[…] before entering, and stop after three losses or one news-spike loss, whichever comes first. The trend pullback strategy on this site pairs naturally with this routine, because its pullback entries and the STC’s […]
[…] moves to breakeven once the first target is hit. That is the same target discipline I use with the trend pullback approach on this site, and it works with HalfTrend for the same reason: the indicator decides […]
[…] into 640 or 800 dollars, and one such loss eats a sixth of the daily limit instead of a tenth. The trend pullback strategy and the Judas swing strategy both teach the same underlying lesson from different structures: the […]
[…] it differs from the other reversal strategies on this site is worth stating plainly. A trend pullback trades with the trend after a dip; the bump and run trades against an exhausted trend after a […]
[…] justify tying up the account for two weeks. I also never stack a point and figure trade on top of a trend pullback trade on the same pair, because two strategies on one pair are one position with extra steps, and […]
[…] dipping just under a rising 20 WMA and then closing back above it, which is the pullback pattern my trend pullback guide describes in […]
[…] phase test is what separates this strategy from my trend pullback guide, which takes any clean pullback in a trending market. Dow Theory adds two questions the pullback […]
[…] the system trades on most trend days without forcing trades on range days. It also differs from my trend pullback guide, which takes any clean pullback, and from my Dow Theory guide, which adds phase and volume tests: […]
[…] trade came from my trend pullback setup: an uptrend on the daily chart, a pullback to a prior support zone on H1, and a rejection […]
[…] last swing, the next level, the measured move — not from the next bend in a moving average. My trend pullback article covers the structure side of the same trade, and my Jurik moving average article covers a different […]
[…] news moves the pair for reasons no chart pattern can predict. The London breakout strategy and the trend pullback strategy both work on EURCAD, but only inside the session and news rules above. Outside them, the same […]
[…] into chop while the trader keeps taking signals. A broken fork is visible in one candle. My trend pullback strategy remains my higher-frequency setup, and my Fibonacci retracement guide covers measured levels inside […]
[…] into chop while the trader keeps taking signals. A failed 13 is visible in one new count. My trend pullback strategy remains my higher-frequency setup, and my Fibonacci retracement guide covers measured levels inside […]
[…] site. A pullback to a fan line that also lines up with a moving average zone or a level from my trend pullback strategy is a stronger setup than a fan touch on its own. A fan touch that fights the RSI trend is a setup I […]
[…] entry of one pattern with the stop of another gives you the worst of both. For trend context, the trend pullback strategy remains my default when price is still trending cleanly, and two crows only earns a trade when that […]
[…] 2,000-pip pullback into the rising 20-day average, the only entry I take on this […]
[…] was softening, and the pair printed a clean higher low just above 20.4000 as Frankfurt opened. My trend pullback rules said the pullback was done. Entry at 20.4500, stop below the pullback low at 20.3000, which […]
[…] on a red-dot day is still a trading day, and it is the cheapest trading day you will ever have. My trend pullback strategy is the setup I trade when the squeeze says the market is awake but there is no compression to […]
[…] a rejection there is a clean short with a stop just above the line. This is the same logic as my trend pullback rules, only the line is diagonal instead of horizontal. I take retests only on the 50% and 61.8% […]
[…] on memes and can spike 1,000 pips on a single post, which makes a 200-pip stop meaningless. My trend pullback strategy is the setup I use on […]
[…] right. The stop was 50 points, the risk was 500 dollars, and the division gave ten lots exactly. My Trend Pullback guide runs the same retest logic on a different […]
[…] of rising I know the trend is tiring, which is the Kagi version of the advance block warning my Trend Pullback guide describes for […]
[…] one carry position at a time. One pair, one direction, one open trade: the same discipline as my trend pullback strategy, because a funded account is not the place to run a […]
[…] is one more distinction worth making, because it decides whether the strategy overlaps the trend pullback strategy I already trade. The trend pullback strategy takes the first clean pullback into a zone. The second […]