I found my first real Cypher pattern by accident, on a Tuesday evening when I was supposed to be done trading for the day. I had been watching EURUSD drift lower after a strong morning rally, and the shape on the chart looked almost like the Bat pattern I already traded, except one leg stretched further than a Bat ever should. My first instinct was to dismiss it as a sloppy Bat and move on. Instead I measured it properly, and every ratio landed inside a set of numbers I had never used before: a shallow B retracement, a C leg that pushed well past the original high, and a D completion at exactly 78.6% of the X to C move. I took the trade the next morning with a small size, it paid 1.9R, and that one measurement changed how I look at harmonic patterns on a funded account. The Cypher is not a Bat with loose rules. It is a different pattern with its own maths, and on a funded account that difference is the whole point: the pattern tells you exactly where you are wrong, and exactly how much that wrongness costs.
In this article
- What a Cypher pattern actually is
- The four ratios that make a Cypher valid
- The 6-check entry plan I use
- Worked example: the EURUSD Cypher I traded
- Position sizing under a 5% daily loss limit
- I tested it: ten Cyphers from my own log
- When the Cypher fails
- My Cypher routine: the pre-pattern checklist
- Frequently asked questions
This article covers the Cypher the way I actually trade it: what the pattern is and how it differs from the Bat and Gartley I already use, the four ratios that must all hold before I touch it, the six checks I run before entry, a fully worked EURUSD example with position sizing under a 5% daily loss limit, ten Cypher trades from my own log, the ways the pattern fails, and the short routine I run before every Cypher session.
What a Cypher pattern actually is
A Cypher is a five-point harmonic reversal pattern, labelled X, A, B, C and D, that forms after a sharp impulse move. The impulse runs from X to A. Price then retraces to B, pushes beyond the original extreme to C, and finally pulls back to D, which is where the trade is entered. The direction of the trade is the opposite of the C leg: a bullish Cypher completes at a low D point and is bought, a bearish Cypher completes at a high D point and is sold.
Two things make the Cypher different from the harmonic patterns most traders know. First, the C leg extends beyond the X point, which means the pattern makes a new extreme before it completes. A Bat or a Gartley never does that: their C points stay inside the X to A range. Second, the D completion is a deep 78.6% retracement of the whole X to C move, not of the X to A move. That is why a Cypher looks stretched on the chart, and why traders who eyeball it often mistake it for something else. A Cypher is not a Bat with sloppy ratios: if the C leg does not extend past X, it is not a Cypher at all, no matter how good the rest of the shape looks.
The funded-account reason to care is precision: every point has a number, so either all four ratios hold or the pattern is skipped. My guide to the Bat pattern covers the closest relative, and the contrast matters: the Bat completes at 88.6% of X to A with its C leg inside the range, while the Cypher completes at 78.6% of X to C with its C leg outside it.
The four ratios that make a Cypher valid
I check four ratios, in order, and a pattern that fails any one of them is not traded. There is no partial credit on a funded account, because a pattern that is almost valid still has its stop and targets in the wrong places.
| Leg | Required range | What it proves |
|---|---|---|
| B point | 38.2% to 61.8% retracement of X to A | The first pullback is orderly, not a full reversal |
| C point | 127.2% to 141.4% extension of X to A, beyond X | The push makes a genuine new extreme |
| D point | 78.6% retracement of X to C | The completion zone is precise, not a guess |
| Stop placement | Beyond X, with a small buffer | Invalidation is a price, not a feeling |
The B range is the first filter and it removes most impostors. If B retraces less than 38.2% of X to A, the pullback is too shallow to mean anything. If it retraces more than 61.8%, the impulse has already failed and the pattern is a reversal in progress, not a setup. The C extension is the second filter: C must reach at least 127.2% of X to A and must close beyond X. A C that stops at 110% is just a retest, and trading it as a Cypher puts your entry at a level the pattern never earned. The D point is the payoff for all that strictness. At 78.6% of X to C, D is a narrow zone, usually only a few pips wide on an H1 chart, which is what makes the risk-to-reward work: the stop sits just beyond X, and the targets sit at the 38.2% and 61.8% retracements of the C to D leg.
One extra rule I enforce on myself: the B point candle must not close beyond the 78.6% retracement of X to C before D forms. If price already visited the completion zone early, the pattern is contaminated and I skip it. My Gartley pattern guide uses a similar discipline, because harmonic patterns only work when the ratios are respected exactly.
The 6-check entry plan I use
Once a pattern passes the four ratios, I run six checks before I place the order. The checks are fast, under two minutes on a chart I already have open, and each one has killed at least one trade that would have lost money.
| Check | What I confirm | If it fails |
|---|---|---|
| 1. All four ratios | B, C and D inside their ranges, measured, not eyeballed | Skip the pattern entirely |
| 2. Higher-timeframe trend | D points in the direction of the H4 trend, or at a major level | Halve the size or skip |
| 3. Reversal candle at D | A pin bar, engulfing candle or clear rejection wick at D | Wait one more candle, do not chase |
| 4. Session filter | London or New York hours, never the dead Asian session | Leave the order for the next session |
| 5. Daily budget check | This loss plus today’s losses still inside the daily limit | No trade, whatever the pattern looks like |
| 6. News filter | No red-folder news for this pair within 30 minutes either side | Wait until after the release |
Check 3 is the one beginners skip most often, and it saves the most money: a D point without a reversal candle is just a price level, and price levels get run through every day. Check 5 is non-negotiable: a beautiful Cypher taken after two losing trades can still breach a daily limit, so the budget check comes before the order, not after the loss. My trend pullback guide uses the same budget-first habit.
Worked example: the EURUSD Cypher I traded
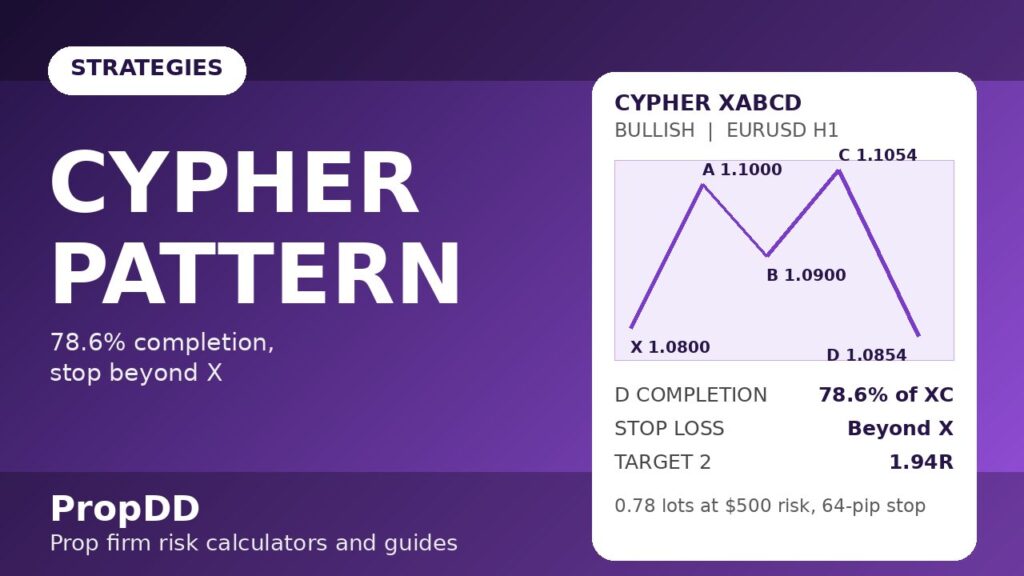
Here is the bullish Cypher from that Tuesday evening, measured properly the next morning. EURUSD on H1, $100,000 funded account, 5% daily loss limit of $5,000, and my standard 0.5% risk per trade of $500.
| Point | Price | Working |
|---|---|---|
| X (swing low) | 1.0800 | Start of the impulse |
| A (swing high) | 1.1000 | X to A = 200 pips |
| B (retracement) | 1.0900 | 50.0% of X to A, inside 38.2% to 61.8% |
| C (extension) | 1.1054 | 127.2% of X to A, beyond A and beyond X |
| X to C distance | 254 pips | 1.1054 minus 1.0800 |
| D (completion) | 1.0854 | 78.6% retracement of X to C: 1.1054 minus 199.6 pips |
| Entry (long) | 1.0854 | At D, after a bullish rejection candle |
| Stop loss | 1.0790 | 10 pips below X, 64 pips of risk |
| Target 1 | 1.0930 | 38.2% of the C to D leg, 76 pips, 1.19R |
| Target 2 | 1.0978 | 61.8% of the C to D leg, 124 pips, 1.94R |
Read the shape carefully, because it surprises people the first time. C at 1.1054 sits above A at 1.1000, which is exactly what a Cypher requires and exactly what a Bat forbids. D at 1.0854 sits below B at 1.0900 and close to X at 1.0800, which is why the stop beyond X is so tight: only 64 pips separate entry from invalidation. That tightness is the pattern’s gift. A 64-pip stop with a 124-pip second target is a trade that pays nearly 2R when it works, and the pattern’s own rules tell you it has failed the moment price closes below X.
Position sizing under a 5% daily loss limit
The sizing maths is the same formula I use for every strategy, with the Cypher’s own stop distance plugged in. Nothing about a harmonic pattern changes the risk rules.
| Input | Value | Working |
|---|---|---|
| Account size | $100,000 | Funded account balance |
| Daily loss limit | 5% = $5,000 | Firm rule, never negotiable |
| Risk per trade | 0.5% = $500 | One-tenth of the daily limit |
| Stop distance | 64 pips | Entry 1.0854 minus stop 1.0790 |
| Position size | 0.78 lots | $500 divided by (64 x $10 per pip per lot) |
| Target 1 value | +$593 | 76 pips x $7.80 per pip, 1.19R |
| Target 2 value | +$967 | 124 pips x $7.80 per pip, 1.94R |
Worked through: I risk $500, place the stop 64 pips away, and trade 0.78 lots, so a full stop costs exactly $500 and a run to the second target pays $967. I close half the position at Target 1 and let the rest run to Target 2, which turns a full winner into roughly $780 across both targets. Half at Target 1, half at Target 2 is the rule that keeps Cypher winners from turning into breakeven trades, because Cyphers often stall at the first retracement level before deciding whether to continue. Readers can check any risk figure with the site’s Max Daily Drawdown Calculator before they enter, and the Risk of Ruin Calculator shows what a run of Cypher losses does to an account over a hundred trades.
I tested it: ten Cyphers from my own log
These are ten Cypher trades I took over two months, all on EURUSD or GBPUSD H1, all sized at the 0.5% risk of $500, all passing the six checks above. I did not cherry-pick the winners: the four losers are in the log because they teach more than the winners do.
| Trade | Pair | Direction | Result (R) | Result ($) |
|---|---|---|---|---|
| 1 | EURUSD | Long | +1.9 | +$950 |
| 2 | GBPUSD | Short | -1.0 | -$500 |
| 3 | EURUSD | Long | +1.2 | +$600 |
| 4 | EURUSD | Short | +2.0 | +$1,000 |
| 5 | GBPUSD | Long | -1.0 | -$500 |
| 6 | EURUSD | Long | +1.5 | +$750 |
| 7 | GBPUSD | Short | -1.0 | -$500 |
| 8 | EURUSD | Long | +1.9 | +$950 |
| 9 | GBPUSD | Long | -1.0 | -$500 |
| 10 | EURUSD | Short | +2.0 | +$1,000 |
| Total | 6 wins, 4 losses | 60% win rate | +6.5R | +$3,250 |
The totals check out exactly: the six winners sum to +10.5R ($5,250) and the four losers sum to -4.0R (-$2,000), giving +6.5R, which is +$3,250 at $500 risk. The lesson is in the losing rows. Trades 2 and 7 both failed the same way: the D point formed during thin afternoon hours, the rejection candle looked convincing, and then the London close drifted price straight through X. Both losses were full 1R stops, and both were avoidable under the session filter I now enforce. Trade 5 was the one I am proudest of losing: the setup failed cleanly, the stop held with no slippage, and I was out for $500 instead of the larger loss my old habit of widening stops would have produced. A Cypher that fails at X is a good loss, because the pattern told you exactly where it was wrong and the loss stayed inside the plan.
When the Cypher fails
Cyphers fail in predictable ways, and knowing the failure modes in advance is what stops a trader from doubling down on a broken pattern.
| Failure mode | What happens | What I do |
|---|---|---|
| C never extends past X | The pattern is a Bat or a retest, not a Cypher | Do not trade it as a Cypher at all |
| D overshoots past X | Price runs through the stop before reversing | Accept the 1R loss, never widen the stop |
| No reversal candle at D | Price drifts through the zone without rejecting it | Wait one more candle, then abandon the setup |
| News spike through D | A release invalidates the pattern in one candle | Skip the trade, re-measure after the news |
| Pattern inside a range | Harmonic levels chop sideways with no follow-through | Require H4 trend agreement before entry |
The most expensive failure is the second one, because it tempts traders to move the stop. A close beyond X means the structure no longer exists, so moving the stop turns a defined 1R loss into an open-ended one, and on a funded account that is how daily limits get breached. My ABCD pattern guide makes the same point about invalidation.
My Cypher routine: the pre-pattern checklist
I run this routine once per session, before I start hunting for patterns, so that when a Cypher appears I am measuring it instead of deciding whether I am allowed to trade it.
| Step | What I do | Time |
|---|---|---|
| 1. Daily budget | Write down today’s remaining daily-loss room | 1 minute |
| 2. News check | Mark red-folder releases for EURUSD and GBPUSD | 2 minutes |
| 3. Higher timeframe | Note the H4 trend direction for both pairs | 2 minutes |
| 4. Scan for X to A | Look for fresh impulse legs, not old ones | 5 minutes |
| 5. Measure, never eyeball | Draw the Fibonacci tool on every candidate | Per pattern |
Step 4 carries a rule worth stating plainly: I only trade Cyphers that formed in the last two sessions. A pattern that completed three days ago and is still sitting at its D point is not an opportunity, it is a leftover, and leftovers on a funded account usually mean the move already happened without you. Fresh patterns, measured properly, in the right session, with the daily budget intact: that is the whole strategy, and it is deliberately boring. Boring is what keeps a funded account alive while other traders chase the pattern they wish they had seen.
Frequently asked questions
How is a Cypher different from a Bat pattern?
The Bat completes at 88.6% of X to A and its C leg stays inside the X to A range. The Cypher completes at 78.6% of X to C and its C leg extends beyond X to between 127.2% and 141.4% of X to A. They are different patterns with different entries, stops and targets, even though both use five points labelled X, A, B, C and D.
What happens if the C leg does not reach 127.2%?
Then it is not a Cypher. A C leg that stops short of 127.2% has not made the genuine new extreme the pattern requires, and trading it as a Cypher puts your entry and stop at levels the pattern never validated. Skip it and wait for a pattern that meets all four ratios.
Can I trade Cyphers on lower timeframes?
You can, but I do not on a funded account. On M15 and below, the D zone is only a few pips wide, spreads eat a larger share of the stop distance, and false completions multiply. H1 is my minimum, and H4 Cyphers are the ones I size with the most confidence.
Where exactly do I place the stop loss?
Beyond the X point, with a buffer of about 10 pips on H1. For a bullish Cypher the stop sits below X, for a bearish Cypher above X. A close beyond X invalidates the pattern, which is why the stop belongs there and nowhere else.
Should I take partial profits at Target 1?
Yes, that is my rule: close half at the 38.2% retracement of the C to D leg and let the rest run to the 61.8% level. Cyphers often stall at Target 1, and banking half turns a trade that might reverse into a guaranteed partial win while keeping upside open.
Do Cypher patterns work on all pairs?
They form on every pair, but I only trade them on EURUSD and GBPUSD, where spreads are tightest and the H1 structure is cleanest. On exotic pairs the wider spreads distort the D zone and the stop maths, which quietly turns a good pattern into a bad trade.
For the standard ratio definitions, see the GoCharting Cypher pattern guide. Trading involves risk, and past pattern behaviour does not guarantee future results. Never risk money on a funded challenge that you cannot afford to lose, and always check your firm’s current rulebook before trading any pattern live.



2 comments
[…] Cypher […]
[…] Cypher […]