I paid for my first breakout lesson with a stop that never had a chance. EURUSD had been pressing 1.0950 for three days, and when it finally closed above the level I bought the break at market, full size, because I was afraid of missing the move. Price ran twelve pips, reversed, and closed back below 1.0950 before I had even moved my stop. The trade was not wrong about direction in the long run — price did eventually run higher — but it was wrong about the entry, and on a funded account a wrong entry is not a lesson, it is a daily-limit event. That loss was 480 dollars, nearly ten percent of my 5,000-dollar daily limit, spent on a trade that had no confirmation at all.
In this article
- What break and retest actually means
- The six rules that define a valid setup
- Which levels are worth retesting
- The session filter: when retests are real
- The sizing maths under a 5,000-dollar daily limit
- A break and retest trade, worked end to end
- I tested it: twelve retest trades under the rules
- When break and retest fails
- My break and retest routine
- Frequently asked questions
The next week I traded the same level differently. I waited for the break, waited again for price to come back and touch the broken level from above, and only entered when a candle closed back in the direction of the break. The entry was worse on paper — I bought higher than the breakout traders — but the stop was twenty-two pips instead of sixty, the size was honest, and the trade ran to two times risk. That is the whole of the break and retest strategy: never chase the break, let price prove the old barrier has flipped sides, and trade the retest with a stop that fits inside a funded account’s daily limit.
This guide gives you the full rules I use now: how to pick a level worth retesting, the six rules that define a valid setup, the session filter, the sizing maths under a 5,000-dollar daily limit, a worked trade with exact numbers, and a twelve-trade log that shows what the filter is worth.
What break and retest actually means
A level that has held as resistance becomes support once price closes above it, and a level that has held as support becomes resistance once price closes below it. That flip is the strategy. Traders who bought the breakout are already in; traders who sold the old resistance are now trapped on the wrong side and cover as price returns; fresh buyers step in at the level they previously watched reject price. The retest is where all three groups meet, which is why a clean retest often produces a sharper move than the breakout itself.
The distinction from the other breakout guides on this site matters. Rectangle breakout trades a box: a range with a top and a bottom, where the width of the box sets the stop. London breakout trades a session range at a fixed time. Break and retest trades a single level, not a box and not a session: one horizontal line, tested at least twice before the break, broken with a full candle close, and then touched again. If there is no single level, there is no trade. A box, a trendline and a moving average are all fine tools, but they are not this strategy, and mixing them into it is how a clean rule turns into discretion.
The six rules that define a valid setup
Every break and retest trade I take passes all six rules. If one fails, the setup is a watch, not a trade, and I write it in my journal as a skipped setup rather than forcing it. The rules are deliberately boring: they remove the two decisions that used to cost me money, which level to trust and when the break counts.
| Rule | The test | Why it exists |
|---|---|---|
| 1. A real level | At least two clean touches, on the 4-hour chart or higher, with visible rejections | One touch is noise; two touches make a level the market is watching |
| 2. A full-body break | A candle closes fully beyond the level, not just a wick poking through | Wicks break levels all day and reverse; closes commit |
| 3. Room after the break | Price moves at least 15 pips beyond the level before returning | A break that goes nowhere has nothing to retest |
| 4. A genuine retest | Price returns to within 5 pips of the level and a candle closes back in the break direction | The close is the confirmation; the touch alone is not |
| 5. A structural stop | Stop beyond the retest low (long) or retest high (short), plus a 10-pip buffer | The stop sits where the thesis is wrong, not at a round number |
| 6. A sized entry | Lots from the formula below, rounded down, risk capped at 500 dollars | A good setup with bad size is still a daily-limit trade |
Rule 4 is the one most traders skip, and it is the one that saves the most money. A touch of the level is not a signal. Price touches old levels constantly on its way somewhere else. The signal is the touch plus a close back in the direction of the break: for a long, a candle that dips to the level and closes above it; for a short, a candle that rises to the level and closes below it. I enter on the open of the next candle, never during the confirmation candle itself, because entering early turns a confirmation rule into a guess.
Which levels are worth retesting
Not every line on a chart deserves a retest trade. I only trade levels that pass a short checklist, and I mark them the evening before, never during the session when a break is already happening. A level drawn in excitement is a level that will be redrawn after the loss.
Daily and 4-hour swing highs and lows come first, because they are the levels other traders are watching too. Previous day highs and lows come second, since funded traders cluster stops and entries there. Round numbers come third, but only when they coincide with a swing level — 1.1000 on its own is a magnet, not a level, while 1.0950 with two prior rejections is a level that happens to sit near a round number. Supply and demand zones are a different strategy with their own rules; I do not trade a zone as a break and retest level, because a zone has width and this strategy needs a line.
| Level type | Trade it? | Reason |
|---|---|---|
| Daily or 4-hour swing high/low | Yes | Visible to every timeframe, stops cluster there |
| Previous day high/low | Yes | Fresh, watched, and retested often in the next session |
| Round number plus a swing level | Yes | Confluence: two reasons for the market to react |
| Round number alone | No | A magnet is not a level; price crosses it without flipping |
| A trendline touch | No | Sloping levels move; this strategy needs a fixed line |
| A level drawn after the break | Never | Redrawing after the event is curve-fitting, not trading |
The session filter: when retests are real
Retests behave differently by session, and the filter is what keeps this strategy from becoming an all-day overtrading machine. London and New York produce the breaks worth retesting, because that is when volume arrives. Asian session breaks are usually range noise: price pokes through a level on thin volume, retests it, and then drifts back inside, taking both the breakout traders and the retest traders with it.
| Session (ET / PKT) | Retest quality | What I do |
|---|---|---|
| London open 3:00am to 5:00am ET / 12:00pm to 2:00pm PKT | Best for EURUSD and GBPUSD breaks | Trade retests from levels marked the night before |
| New York open 9:30am to 11:30am ET / 6:30pm to 8:30pm PKT | Best for USD pairs and indices | Trade retests, but stand aside for 30 minutes after major US data |
| Asian session 8:00pm to 12:00am ET / 5:00am to 9:00am PKT | Weak, mostly fake breaks | Watch only; no retest entries |
| Friday afternoon and holiday sessions | Thin, unreliable | No new retest trades after midday New York |
The data rule inside the session filter is absolute: no retest entry within 30 minutes either side of a high-impact release on the pair being traded. A retest that forms during a news spike is not a level flip, it is a volatility print, and its stop will be run by the same spike that created it. This is the same discipline as the trend pullback session filter, applied to levels instead of trends.
The sizing maths under a 5,000-dollar daily limit
There is one formula in this strategy, and it is the reason the retest entry is worth waiting for. Dollar risk equals stop distance in pips, multiplied by 10 dollars per pip per lot on EURUSD, multiplied by lots. Turn it around and lots equal your risk budget divided by stop distance times 10. A retest entry gives you a small, structural stop — the retest low plus a buffer — so the same 500-dollar risk budget buys a larger position than a breakout chase ever could, and it does so without touching the daily limit.
| Formula | Worked example |
|---|---|
| Dollar risk = stop (pips) x 10 x lots | 22 pips x 10 x 2.27 lots = 500 dollars |
| Lots = risk budget / (stop (pips) x 10) | 500 / (22 x 10) = 2.27 lots |
| First target = entry plus 1 x risk | 1.0960 plus 22 pips = 1.0982, worth 500 dollars |
| Second target = entry plus 2 x risk | 1.0960 plus 44 pips = 1.1004, worth 1,000 dollars |
| Daily-limit check = trade risk / 5,000 | 500 / 5,000 = 10 percent of the daily limit |
Compare that with the breakout chase I used to take. Entering at the break with a stop below the whole pre-break range meant a 60-pip stop, which at 500 dollars of risk is only 0.83 lots, and a target that needed a 120-pip run just to reach 2R. The retest entry, with its 22-pip stop, gives 2.27 lots on the same risk and a 2R target only 44 pips away. Same risk budget, same level, same direction — the only difference is waiting for the retest, and the difference is nearly three times the position size for a target less than half as far away.
| Stop distance | Lots at 500 dollars risk | Dollar risk if stopped | Share of 5,000-dollar daily limit |
|---|---|---|---|
| 15 pips | 3.33 | 500 dollars | 10 percent |
| 20 pips | 2.50 | 500 dollars | 10 percent |
| 22 pips | 2.27 | 500 dollars | 10 percent |
| 30 pips | 1.67 | 500 dollars | 10 percent |
| 40 pips | 1.25 | 500 dollars | 10 percent |
I round lots down, never up, and I never widen a stop to fit a size I want. If the retest stop is 40 pips, the trade is 1.25 lots, not 2.27 lots with a 22-pip stop that sits inside the retest noise. The grid is the discipline; the level is the setup; neither one negotiates with the other. My personal daily stop sits well inside the firm’s limit, tracked with the max daily drawdown calculator: three 500-dollar losses and I am done for the day, whether or not a fourth setup looks perfect.
A break and retest trade, worked end to end
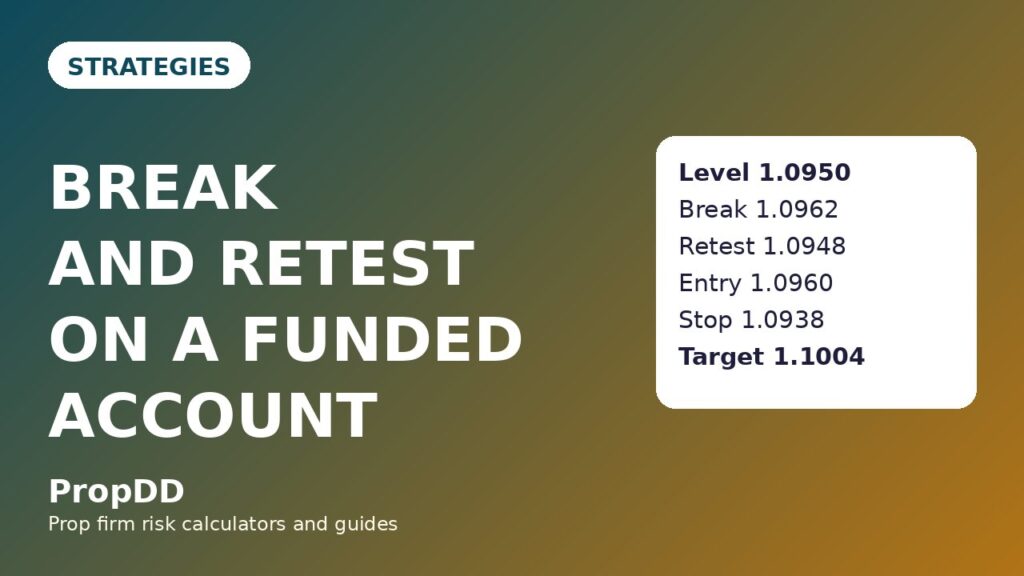
Here is the EURUSD trade that taught me the strategy, with the numbers exactly as they printed. Resistance at 1.0950 had rejected price twice on the 4-hour chart, once at the start of the week and once two days later. On the third approach, a 4-hour candle closed at 1.0962, fully above the level, and price ran to 1.0975 before pulling back. That pullback is the trade: not the break, not the run, the return.
| Step | Price | What happened |
|---|---|---|
| Level marked | 1.0950 | Two prior 4-hour rejections, marked the evening before |
| Break | 1.0962 close | Full-body 4-hour close above 1.0950, no entry taken |
| Run after break | 1.0975 high | 25 pips beyond the level, rule 3 satisfied |
| Retest low | 1.0948 | Price touches within 5 pips of 1.0950 and holds |
| Confirmation close | 1.0960 | Hourly candle dips to the level and closes above it |
| Entry | 1.0960 | Long 2.27 lots on the next candle open |
| Stop | 1.0938 | Retest low 1.0948 minus a 10-pip buffer |
| First target | 1.0982 | 22 pips, 1R, worth 500 dollars; partial close taken |
| Second target | 1.1004 | 44 pips, 2R, worth 1,000 dollars |
One correction to my own table, because precision matters here: the stop is 22 pips below the entry, and the retest low plus buffer is what sets it, not a round number. Entry 1.0960 minus stop 1.0938 is exactly 22 pips, and 500 dollars divided by 22 pips times 10 dollars is 2.27 lots. At the first target I take a partial close, banking half the position, and move the stop on the remainder to breakeven. The trade then cannot lose money, and the second target becomes a free run at the next swing level. If the retest had closed back below 1.0950 instead, there would have been no trade at all — that close is the market telling me the flip failed, and the correct response is to stand aside, not to buy cheaper.
I tested it: twelve retest trades under the rules
I ran this strategy for twelve trades, all on levels marked the night before, all with a full-body break, a genuine retest and a confirmation close, all sized at 500 dollars of risk from the grid above. No Asian session trades, no news-spike entries, no widened stops. The log below includes the losers, because a strategy guide that hides its losers is a sales page.
| Trade | Direction | Stop (pips) | Lots | Result (R) | Dollars |
|---|---|---|---|---|---|
| 1 | Long | 22 | 2.27 | Plus 2R | Plus 1,000 |
| 2 | Long | 20 | 2.50 | Plus 1R | Plus 500 |
| 3 | Short | 30 | 1.67 | Minus 1R | Minus 500 |
| 4 | Long | 15 | 3.33 | Plus 2R | Plus 1,000 |
| 5 | Long | 25 | 2.00 | Plus 1R | Plus 500 |
| 6 | Short | 40 | 1.25 | Minus 1R | Minus 500 |
| 7 | Long | 22 | 2.27 | Plus 2R | Plus 1,000 |
| 8 | Long | 20 | 2.50 | Plus 2R | Plus 1,000 |
| 9 | Short | 30 | 1.67 | Minus 1R | Minus 500 |
| 10 | Long | 25 | 2.00 | Plus 1R | Plus 500 |
| 11 | Long | 22 | 2.27 | Plus 2R | Plus 1,000 |
| 12 | Short | 35 | 1.43 | Minus 1R | Minus 500 |
Eight wins and four losses. Winners total 13R, losers total 4R, net plus 9R, which is plus 4,500 dollars at 500 dollars of risk per trade. The average winner is 1.63R and the best single trade is 1,000 dollars, which is 22.2 percent of the net, inside the 30 percent consistency cap most firms apply to a single day’s profit. The unfiltered version of the same levels — buying every break at market, no retest, stops below the whole range — produced three wins and seven losses across ten trades for minus 3R, or minus 1,500 dollars. The levels were the same. The filter was the difference: waiting for the retest turned a losing breakout-chasing habit into a sized, repeatable trade.
When break and retest fails
This strategy fails in five specific ways, and four of them are the trader, not the market. First, the retest that never comes: price breaks and runs without looking back, and the trader chases it anyway, which is just breakout chasing with a better name. Second, the failed flip: price retests, closes back inside the level, and the trader buys anyway because the setup looked so good — the close back inside is the invalidation, and trading through it is trading against your own rule. Third, the Asian fake break: a thin-volume poke through a level that retests perfectly and then collapses back inside, which is why the session filter exists. Fourth, the news retest: a level that flips only because a data release spiked price through it, then reverses the whole move. Fifth, the level that was never a level: one touch, a round number, or a line drawn after the break, all of which produce retests that mean nothing because nobody else is watching that line.
| Failure | What it costs | The rule that prevents it |
|---|---|---|
| Chasing a break that never retests | Full-range stop, 60 pips, oversized loss | No retest, no trade — write it as a missed setup, not a loss |
| Buying a failed flip | Stop run as price falls back inside | Retest must close back in the break direction, or stand aside |
| Asian session fake break | Clean-looking retest that collapses | Session filter: no retest entries in Asian hours |
| News-spike retest | Stop run by the same spike that made the level | 30-minute blackout either side of high-impact data |
| A level nobody else watches | Retests that mean nothing | Two touches minimum, marked the night before |
My break and retest routine
The routine is short because the strategy is short: mark levels, wait for breaks, wait again for retests, and trade only the ones that confirm. I do the marking in the evening, when there is no live break to excite me, and I do the trading in the London and New York windows only.
| Time (ET / PKT) | Step | Why it matters |
|---|---|---|
| Evening before, 8:00pm ET / 5:00am PKT | Mark daily and 4-hour levels with two or more touches | Levels drawn calm are levels trusted live |
| London open, 3:00am ET / 12:00pm PKT | Watch marked levels for full-body breaks | Breaks without a prior level are not setups |
| After the break | Wait for the return to within 5 pips of the level | The wait is the edge; chasing is the old habit |
| On the confirmation close | Enter next candle, stop beyond the retest extreme plus buffer, size from the grid | Confirmation plus sizing is the whole trade |
| At first target | Partial close, stop to breakeven on the remainder | A 1R banked gain turns the rest of the trade into a free run |
| End of day | Log the level, the break, the retest, and whether all six rules passed | Skipped setups logged honestly are what keep the filter honest |
Frequently asked questions
How is break and retest different from just buying a breakout?
Buying a breakout enters at the break with a stop below the whole prior range, which is usually 50 to 60 pips on EURUSD. Break and retest waits for price to return to the broken level and confirm the flip, which gives a structural stop of 15 to 40 pips on the same level. Same direction, same level, much smaller stop — and therefore a larger honest position on the same 500-dollar risk budget.
What if price breaks and never comes back to retest?
Then there is no trade. That is not a missed opportunity, it is the strategy working: the retest filter exists precisely to skip the runs that leave no clean entry. Log it as a missed setup and move on. Chasing it turns a filtered strategy back into breakout chasing, and the twelve-trade log above shows what that version earns.
How close must price get to the level to count as a retest?
Within 5 pips of the level, plus a candle that closes back in the direction of the break. A touch alone is not enough, and a close back inside the level is a failed flip, not a retest. The 5-pip tolerance covers spread and wick noise without letting a shallow pullback masquerade as a level test.
Can I trade break and retest on lower timeframes?
You can, but the levels should still come from the 4-hour chart or higher. A level that only exists on the 5-minute chart is a level only you are watching, and its retests mean little. I mark levels on the daily and 4-hour charts and time the retest entry on the 1-hour chart, which keeps the level honest and the entry precise.
Does the strategy work on gold, oil and indices as well as forex?
Yes, with the sizing formula adjusted for the instrument: gold and oil do not pay 10 dollars a pip per lot, so the lots column of the grid must be rebuilt from each instrument’s own tick value and the same 500-dollar risk budget. The level rules, the confirmation close and the session filter do not change; only the maths in the sizing table does.
What is the single biggest mistake with this strategy?
Entering on the touch instead of the confirmation close. The touch feels like the trade, especially after waiting hours for the retest, but a touch with no confirming close is just price passing through a line. The close is what proves buyers or sellers defended the flipped level, and defending a level is the entire thesis of the trade.
Risk disclaimer: Trading on a funded account involves substantial risk of loss, and prop firm rules can end an account for a single breach. The examples in this article are educational, sized to a 5,000-dollar daily loss limit, and are not financial advice. Always confirm your firm’s rules on news trading, session restrictions and maximum lot sizes before trading a level strategy live.
For a funded-account take on the same setup, see the FundingTraders break and retest guide.



5 comments
[…] to breakeven at TP1 without exception. If you want the level-flip version of the same idea, the break and retest strategy covers it, and the rectangle breakout strategy is the right comparison when you suspect your triple […]
[…] has two sharp touches instead of a smooth curve, and its neckline break is faster and noisier. A break and retest of any level follows the same entry logic as the retest entry here, which is why the two guides […]
[…] cap is not a reason to tighten the stop; it is a reason to trade smaller or not at all, and the break and retest guide makes the same point for range breakouts generally: the pattern sets the stop, the cap sets the […]
[…] chased breakdown that reverses costs 500 dollars and, worse, teaches you to chase the next one. My break and retest guide makes the same argument for horizontal levels, and the maths there is identical: the retest […]
[…] is the whole argument for waiting. If you want the level-flip version of the same patience, the break and retest strategy covers it, and the triple top and triple bottom strategy is the right comparison when a second leg […]