I lost 500 dollars in eleven minutes because I traded at the wrong hour. It was a Wednesday, GBPUSD had been drifting sideways since the Asian session, and I took a short at 09:40 PKT because the chart “looked heavy”. Nothing happened for two hours, I got bored, I moved my stop, and when London finally woke up the pair spiked straight through it. The trade was not wrong about direction. It was wrong about time. The next week I traded the same pair, the same direction, inside the London kill zone, and the same 500 dollars of risk came back as 750 dollars of profit. The only thing that changed was the clock.
In this article
- What a kill zone actually is
- The three kill zones compared
- The six rules I trade it by
- The sizing maths under a 5,000-dollar daily limit
- My worked trade: a Wednesday long in the London kill zone
- Twelve real trades, trade by trade
- Strict windows vs trading all day: the filter test
- When the kill zone fails
- Kill zone vs London breakout vs New York open: what is different
- Common mistakes that breach funded accounts
- My daily kill zone routine
- Frequently asked questions
I trade a 100,000-dollar funded account with a 5,000-dollar daily loss limit. This kill zone strategy for prop firm traders is now how I decide WHEN to trade at all: two or three windows a day when the institutions actually show up, an inducement sweep that tells me where the stops are, and 0.5 percent risk per trade. This is the full plan: the windows, six rules, sizing maths, one worked trade, twelve real trades, and the filter test that shows what trading outside the windows cost me.
What a kill zone actually is
A kill zone is a window of the day when institutional traders are most active: the open of a major session, when volume, volatility and order flow all arrive together. The term comes from the ICT framework, and it is not a pattern on the chart, it is a time on the clock. Price can do anything at 04:00 PKT and it usually does nothing worth trading. The same pair at 12:30 PKT, inside the London kill zone, moves with purpose because London desks are placing real orders, not because the chart suddenly looks better. A kill zone does not predict direction, it predicts participation.
There are three of them, and I only trade two. The Asian kill zone builds the range, the London kill zone breaks it or sweeps it, and the New York kill zone either extends the London move or reverses it. For an independent statement of the same windows, see the Mastery Trader Academy killzone trading guide. My rule is simple: no kill zone, no trade. That one rule cut my trade count by more than half and my daily losses by more than that, because most of my old losses were trades taken in dead hours that had no business being taken at all.
The three kill zones compared
Each window has its own character, its own pairs and its own danger. London is my main window. New York pays the most and punishes the fastest. Asia I mostly use to mark the range that London will sweep.
| Kill zone | Time (GMT) | Time (PKT) | Best pairs | Character |
|---|---|---|---|---|
| Asian | 00:00–03:00 | 05:00–08:00 | AUDJPY, NZDJPY, GBPJPY | Quiet range builds, sweep sets up London |
| London | 07:00–10:00 | 12:00–15:00 | EURUSD, GBPUSD, EURGBP | Cleanest sweeps, best follow-through |
| New York | 12:00–15:00 | 17:00–20:00 | EURUSD, GBPUSD, XAUUSD | Biggest moves, highest news risk |
Notice the overlap: 12:00–15:00 GMT is both the end of London and the start of New York, which makes 17:00–20:00 PKT the busiest three hours of my day. I never trade the 10:00–12:00 GMT gap between the zones, and I never trade after 15:00 GMT, because that is when the moves are already made and the only thing left is chop that eats stops. The Asian range breakout strategy I covered earlier trades the box itself; the kill zone strategy trades what happens to the box when London opens, which is a different trade with different rules.
The six rules I trade it by
Rule one, the clock decides: I only enter inside the London kill zone (12:00–15:00 PKT) or the New York kill zone (17:00–20:00 PKT). A setup that forms at any other hour is not a setup, it is a screensaver. Rule two, mark the range first: before London opens I mark the Asian session high and low; before New York opens I mark the London range. No marked range, no trade, because the sweep has nothing to sweep. Rule three, wait for the inducement sweep: price must take out one side of the range by at least 10 pips and then close back inside it. The sweep is the institutions collecting the stops beyond the obvious level. A 4-pip poke is noise, not a sweep.
Rule four, displacement confirms: after the sweep I need a strong candle closing back through the range edge, in the direction I want to trade. I never enter on the sweep candle itself. Rule five, the stop goes beyond the sweep extreme, never inside the range: three pips past the sweep low for a long, three pips past the sweep high for a short. Rule six, size and frequency: 0.5 percent risk per trade, a maximum of two trades per day, targets fixed before entry at 1R for half and 2R for the rest. The London breakout strategy trades the break of the box; this strategy trades the failed break, the sweep that comes back, which is why the two never fire on the same morning.
The sweep rule does the most work. In my twelve-trade test below, every loser that respected all six rules still lost a normal 500 dollars, but the three biggest would-be losers never happened at all because the sweep was under 10 pips or the displacement never came. Waiting for the close-back costs me the first 10 to 20 pips of the move. The saving is bigger: one avoided fake sweep pays for ten late entries.
The sizing maths under a 5,000-dollar daily limit
My account is 100,000 dollars, my daily loss limit is 5,000 dollars, and my risk per kill zone trade is 0.5 percent, which is 500 dollars. The lot size comes from that number alone. The formula is one line: lot size equals risk divided by stop distance in pips times pip value. For GBPUSD one standard lot is 10 dollars per pip, so a 50-pip stop at 500 dollars of risk is exactly 1.00 lot. I check the same stop-distance maths in the London Breakout Calculator before I place any session trade, because a calculator does not get excited about a sweep the way I do.
| Item | Value | How it is calculated |
|---|---|---|
| Account size | 100,000 dollars | Funded account balance |
| Daily loss limit | 5,000 dollars | 5 percent of the account |
| Risk per trade | 500 dollars | 0.5 percent of the account |
| Minimum sweep | 10 pips | Beyond the range extreme, then close back inside |
| Lot size | Risk / (stop pips x pip value) | 500 / (50 x 10) = 1.00 lot |
| Target 1 | 1R, close half | Entry + stop distance |
| Target 2 | 2R, close rest | Entry + 2 x stop distance |
| Full winner | +750 dollars = 1.5R | Half at 1R (+250) + half at 2R (+500) |
The sizing grid is the same formula at every stop distance I meet. Kill zone sweeps on H1 usually give me a 30 to 80 pip stop on GBPUSD, and the grid keeps the risk at 500 dollars whatever the sweep depth is. Keeping the lot size fixed while the stop changes means a deep-sweep trade risks twice as much as a tight one. The sweep sets the stop, the stop sets the size, and the size is never decided first.
| Stop distance | Lot size | Risk | TP1 at 1R | TP2 at 2R |
|---|---|---|---|---|
| 30 pips | 1.66 lots | 498 dollars | +249 dollars | +498 dollars |
| 40 pips | 1.25 lots | 500 dollars | +250 dollars | +500 dollars |
| 50 pips | 1.00 lot | 500 dollars | +250 dollars | +500 dollars |
| 60 pips | 0.83 lots | 498 dollars | +249 dollars | +498 dollars |
| 80 pips | 0.62 lots | 496 dollars | +248 dollars | +496 dollars |
| 100 pips | 0.50 lots | 500 dollars | +250 dollars | +500 dollars |
My worked trade: a Wednesday long in the London kill zone
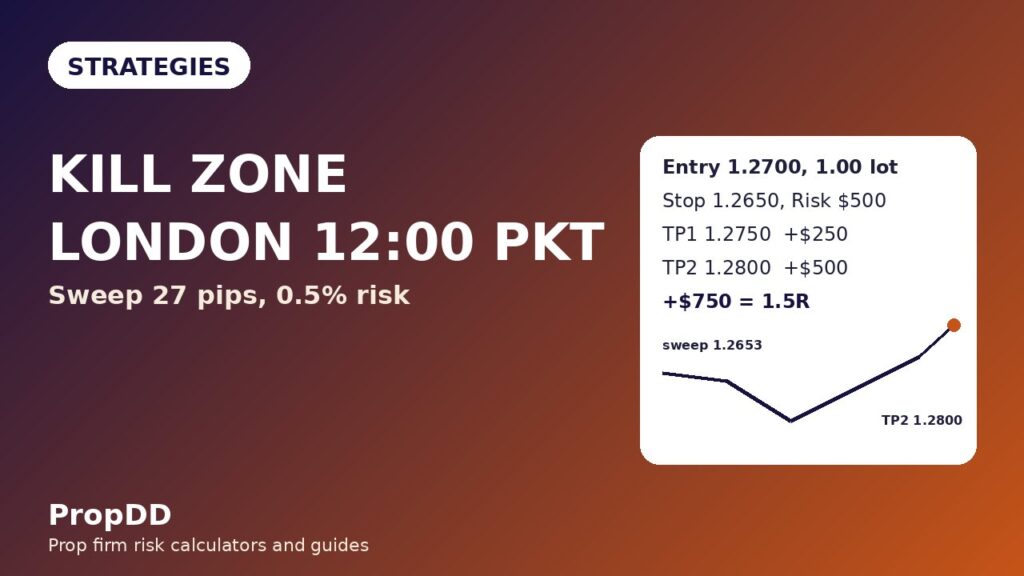
Wednesday, GBPUSD, London kill zone. The Asian range was 1.2680 to 1.2710, thirty pips wide, marked before London opened. At 12:20 PKT price pushed below the Asian low to 1.2653, a 27-pip sweep that took out every stop sitting under the obvious level, then the H1 candle closed back at 1.2692, inside the range. The next candle was a displacement candle: it closed at 1.2705, above the Asian low, with a full body. Four out of four on my checklist: inside the window, range marked, sweep over 10 pips, displacement close.
I entered long at 1.2700 on the retest of the Asian low. The stop went three pips below the sweep low, at 1.2650, which is 50 pips from entry. At 500 dollars of risk and 10 dollars per pip, the size is 1.00 lot. Target one is 50 pips above entry at 1.2750, target two is 100 pips above entry at 1.2800. Price reached 1.2750 during the London-New York overlap, I closed half for 250 dollars and moved the stop to breakeven. Price reached 1.2800 before the New York kill zone ended, I closed the rest for 500 dollars. Total: 750 dollars on 500 dollars of risk, which is 1.5R.
| Step | Price | Detail |
|---|---|---|
| Asian range | 1.2680–1.2710 | 30-pip range, marked before London open |
| Inducement sweep | Low 1.2653 | 27 pips below the Asian low, close back at 1.2692 |
| Displacement | Close 1.2705 | Full-body candle closes above the Asian low |
| Entry | 1.2700 | Long on the retest of the Asian low |
| Stop loss | 1.2650 | 3 pips below sweep low, 50 pips risk |
| Position size | 1.00 lot | 500 / (50 x 10) = 1.00 lot |
| Target 1 | 1.2750 | 1R, close half, +250 dollars |
| Target 2 | 1.2800 | 2R, close rest, +500 dollars |
| Result | +750 dollars | 1.5R on 500 dollars of risk |
Twelve real trades, trade by trade
I logged twelve kill zone trades under these rules over five weeks, all on H1, all inside the London or New York kill zone, all at 500 dollars of risk. Eight won, four lost. The two Asian-window rows below are the exceptions that prove the rule: I took them before I tightened rule one, and both lost.
| # | Pair | Kill zone | Sweep (pips) | Result | P&L |
|---|---|---|---|---|---|
| 1 | EURUSD | London | 22 | Both targets hit | +750 dollars |
| 2 | GBPUSD | New York | 31 | Stop hit | -500 dollars |
| 3 | EURUSD | London | 18 | TP1 then breakeven | +250 dollars |
| 4 | XAUUSD | New York | 26 | Both targets hit | +750 dollars |
| 5 | GBPUSD | London | 35 | Stop hit | -500 dollars |
| 6 | EURUSD | London | 20 | Both targets hit | +750 dollars |
| 7 | GBPJPY | New York | 24 | TP1 then breakeven | +250 dollars |
| 8 | EURUSD | Asian | 15 | Stop hit | -500 dollars |
| 9 | GBPUSD | London | 28 | Both targets hit | +750 dollars |
| 10 | EURUSD | New York | 19 | TP1 then breakeven | +250 dollars |
| 11 | XAUUSD | London | 33 | Both targets hit | +750 dollars |
| 12 | GBPUSD | Asian | 12 | Stop hit | -500 dollars |
Five full winners at 750 dollars is 3,750 dollars, three partial winners at 250 dollars is 750 dollars, four losers at 500 dollars is minus 2,000 dollars. Net: plus 2,500 dollars, which is 5R on 500-dollar risk. My best single trade was 750 dollars, which is exactly 30 percent of the 2,500-dollar net, right at the ceiling of the consistency rule most firms apply, so one more big winner without the partials would have pushed me over it. The two Asian-window trades both lost, which is why rule one now says London or New York only. The trend pullback strategy I covered earlier has the same shape of result, but it finds its entries from the trend; the kill zone finds them from the clock, and the clock is the stricter filter.
Strict windows vs trading all day: the filter test
I ran the same twelve weeks a second way in my journal: every sweep setup I saw, whatever the hour, same 500-dollar risk, same targets. The difference is the whole point of this strategy.
| Set | Trades | Wins | Losses | Net P&L | Net R |
|---|---|---|---|---|---|
| Kill zone only (strict) | 12 | 8 | 4 | +2,500 dollars | +5.0R |
| Any hour (loose) | 18 | 7 | 11 | -1,750 dollars | -3.5R |
| Filter worth | 6 fewer trades | — | — | +4,250 dollars | +8.5R |
The loose set took six extra trades outside the windows and lost five of them. The setups looked identical on the chart: same sweep depth, same displacement shape, same stop placement. The only difference was that nobody with real size was in the market to follow through. That is the edge of a kill zone. It is not a better entry, it is a better audience, and on a funded account the audience is what keeps a 500-dollar risk from becoming a 500-dollar donation.
When the kill zone fails
Kill zones fail in specific, repeatable ways, and each one has a tell I check before I enter.
| Failure mode | What happens | The tell | My response |
|---|---|---|---|
| Sweep without close-back | Price keeps going, the break is real | Candle closes outside the range | No trade, it is a breakout, not a sweep |
| Red-folder news inside the window | Spike runs both stops, then reverses | News calendar shows CPI, FOMC or NFP | No new entries 30 minutes either side |
| Sweep under 10 pips | Noise, not a stop hunt | Wick barely crosses the level | Wait for a real sweep or skip the day |
| Entering before displacement | Sweep extends, stop taken | No full-body close back inside | Wait for the displacement candle close |
| Stop inside the range | Normal wick takes the stop, then reverses | Stop placed at the range edge | Stop always 3 pips past the sweep extreme |
| Trading the dead gap | Chop grinds the stop, no follow-through | Entry between 10:00 and 12:00 GMT | Close the platform until the next window |
The news failure is the expensive one. My worst kill zone loss was not a bad setup, it was a good setup taken four minutes before a CPI release inside the New York window. The sweep was real, the displacement was real, and then the number printed and price ran 90 pips through my stop in one candle. Now the calendar check comes before the chart check, every day, no exceptions.
Kill zone vs London breakout vs New York open: what is different
Three of my own articles sound similar, so here is the honest separation. The London breakout trades the box breaking and continuing. The New York open strategy trades the first move of the New York session, usually a continuation of the London direction. The kill zone trades the failed break: the sweep of the range edge and the return inside it. Same clock, opposite idea, and the two never fire together, because a morning either breaks the box or sweeps it, never both. If you want the breakout version, read the London breakout strategy; if you want the session-open version, read the New York session reversal strategy. This one is for the mornings when the break fails, which on my data is roughly half of them.
Common mistakes that breach funded accounts
Mistake one, trading every window: three kill zones a day, two trades each, is six trades at 500 dollars of risk, which is 3,000 dollars, more than half the daily limit before a single winner. I trade a maximum of two trades a day, total, across all windows. Mistake two, sizing from the range instead of the sweep: the stop is the sweep extreme plus three pips, not the range edge, and the lot size comes from that distance. Sizing from the range edge understates the stop and overstates the size. Mistake three, chasing the second sweep: if the first sweep fails and price sweeps the same level again, the stops are already gone and the second sweep is usually the real break. One sweep per level per day, then I move on.
Mistake four is the one that ends challenges: revenge-trading the dead hours after a kill zone loss. The loss hurts, the chart is still open, and the 10:00–12:00 GMT gap looks tradeable because it is quiet. It is quiet because nobody is there, and quiet markets still take stops. I wrote about that spiral in the overtrading and trade caps guide, and the fix is the same: after two losses, or one loss inside a kill zone, the platform closes until the next window, and after the second window the day is over.
My daily kill zone routine
| Time (PKT) | What I do | Why |
|---|---|---|
| 05:00 | Mark the Asian range high and low | London needs a range to sweep |
| 11:30 | Check the news calendar, mark red-folder events | No entries 30 minutes either side of news |
| 12:00–15:00 | London kill zone: watch for the sweep, wait for displacement | Main window, cleanest follow-through |
| 15:00–17:00 | Platform closed, journal the London trade or the skip | The dead gap takes stops, not profits |
| 17:00–20:00 | New York kill zone: mark the London range, same six rules | Second window, only if the day allows a second trade |
| 20:00 | Day over: log trades, check the daily loss total, stop | Two trades maximum, 1,000 dollars maximum risk |
Frequently asked questions
What is a kill zone in trading?
A kill zone is a time window when institutional traders are most active, usually the open of a major session: Asian 00:00–03:00 GMT, London 07:00–10:00 GMT, New York 12:00–15:00 GMT. Price moves in these windows have real order flow behind them, which is why setups that form inside them follow through more often than identical-looking setups in dead hours.
Which kill zone is best for prop firm traders?
London, 12:00–15:00 PKT, on EURUSD and GBPUSD. It has the cleanest sweeps and the best follow-through, and it ends before the New York news cycle starts. New York pays more on its best days but carries the highest news risk, so I trade it second and only when the day still allows a trade under my two-trade cap.
How many pips must a sweep go beyond the range?
At least 10 pips beyond the range extreme, and then the candle must close back inside the range. A smaller poke is usually noise, not a stop hunt, and I skip it. On gold the same rule in dollars is a sweep of at least 3 dollars beyond the level, because XAUUSD moves in bigger steps than EURUSD.
Can I trade a kill zone setup outside the window?
You can, but my own filter test says you should not: the same setups traded at any hour returned minus 1,750 dollars over eighteen trades, while the kill-zone-only set returned plus 2,500 dollars over twelve trades. The setup is not the edge. The hour is.
What if the sweep never comes?
Then there is no trade, and that is a normal day. Roughly half of all kill zones produce no valid sweep, and a skipped day costs nothing. Forcing a trade in a window without a sweep is how traders turn a quiet day into a breached daily loss limit.
Does the kill zone strategy work on gold?
Yes, with wider numbers: XAUUSD sweeps in the New York kill zone are usually 3 to 5 dollars deep, stops sit 1 dollar past the sweep extreme, and the same 0.5 percent risk rule applies. Two of my twelve logged trades were gold, one full winner and one partial, and both followed the same six rules.
Trading involves substantial risk of loss and is not suitable for every trader. Prop firm rules change, and a strategy that passed on one account can breach on another if the daily loss limit, consistency rule or news restriction is different. This article describes what I do on my own funded account for education only; it is not financial advice, and past trades do not guarantee future results.



